In some cases, you need to add geospatial data to a layer without exacting precision. Cartographica supports manual editing (and creation) of features in new and existing layers in order to facilitate this.
Feature editing is done in Edit Mode, where your changes are only temporary until you commit them. In edit mode, all of the layers (including the one containing the feature you are editing are "ghosted" behind the editing area so that you can still make out where in the coordinate space you are, but those features don't interfere with your navigation and editing.
When in edit mode, all navigational and zooming features are still available, so feel free to do things like Zoom To Feature or pan around in order to make your working canvas as appropriate as possible.
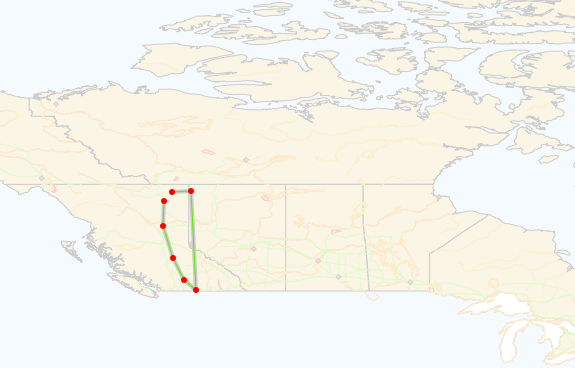
Individual points in features are shown using red dots. When these points are selected, the dots become hollow (have a white circle inside of them) to mark the selection. New points are inserted next to the currently selected point by holding down the Option key and clicking your mouse.
Editing an existing feature
Select the layer containing the feature you want to edit in the Layer Stack
Select the feature to edit in the Map View
Choose > .
(or double-click the feature when you are using the Identify icon in the Map pane)
The map pane goes into Edit mode. When you are in Edit mode, a partially transparent backdrop shows up behind the features you are editing to allow you to discern between what you're editing and the rest of the map. The color and opacity of this layer can be adjusted (see Changing Edit Backdrop Color). The original shape is also shown in the editing background. Here is an example of what the map window looks like in Edit mode.
Now you can change the geometry of the selected features. For example, you could move the location of a city or the path of a road.
There are certain restrictions placed on Cartographica while you are in Edit mode:
While in Edit mode:
Holding the Option key on your keyboard and clicking your mouse adds a new point after the currently selected point.
Pressing the Delete key on the keyboard or choosing > will delete the selected point.
Multiple points may be selected at the same time and will move in unison.
Using the arrow keys will move the selected point in the appropriate direction (autorepeat is enabled).
To close a polygon, commit changes with it still open. Cartographica will add a terminal point at the same location as the origin.
All zoom controls function normally, except typing in the zoom box.
Save or cancel your changes:
To save (commit) your changes after editing, press Enter on the keyboard or choose > again.
To cancel your changes, press the Escape key on the keyboard.
Undo is handled separately when editing to preserve as much context as possible. So, when in edit mode, the undo/redo are used for each individual editing operation (like moving, deleting, or adding a point). Once you leave the edit mode (assuming you accepted the changes), these steps are forgotten but you will be able to undo the entire editing operation.
Once you have exited out of Edit mode and saved your changes, the changes are reflected in the Point Data window.
Adding a New Feature
Select the layer where you want to add the feature in the Layer Stack
Choose >
If the selected layer has no content (and therefore isn't associated with a particular shape type), you are prompted for whether the new shape layer will be a point, line, or polygon.
The map pane goes into Edit mode just like when editing a feature. The same constraints apply to adding a feature as when editing a feature.
To add a new point to a feature in editing mode hold the option key on the keyboard and click to add the point.
Save or cancel your changes:
To save your changes after editing, press Enter on the keyboard or from the Edit menu, select Edit Selected Feature again.
To cancel your changes, press the Escape key on the keyboard.
Once you have saved your changes and exited out of Edit mode, the features you have added to the layer are viewable in the Point Data window.
Changing Edit Backdrop Color
Choose > to bring up the Cartographica Preferences window
Click Edit Backdrop Color color well
The Color Picker will open
Select the color for the editing backdrop
The Opacity slider determines how much of the background layer shows through to the editing view. To hide all other features, set Opacity to 100%. To disable the Edit Backdrop layer, set Opacity to 0%.
Close the Color Picker
Occasionally, geospatial data needs to be corrected by changing coordinates to be more accurate. In these cases, changing values directly in the point window might be more appropriate, especially when correcting obviously erroneous data.
Cartographica has the ability to change any existing point in any feature using the Point Data window.
Precision Editing Features in the Point window
Select the layer in the Layer Stack
Select the data you want to change (either in the Data View or Map View)
Choose >
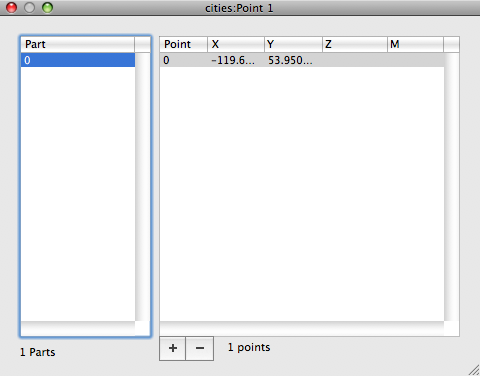
The Point Data window appears showing the currently selected feature's geometry.
To change a point, click on a coordinate and type in a new coordinate value.
If you need to add or remove a point, select the line containing the point and use the and buttons to add or remove it. Of course, undo is available to undo whatever changes you have made.
Points are always edited in their original projection (CRS), so if your map is displayed in state plane, but the data you're editing is in Lat/Long, the editing will be in Lat Long unless you Reproject the points in the layer.