Acquiring database information works similarly to Section 3.4, “Importing Text Files and Table Data”, except that instead of reading the data from a data file, it is read from a database. By using Open Database Connectivity (ODBC) Cartographica is compatible with a wide variety of file formats and database systems (including, but not limited to: Filemaker Pro, Oracle, MySQL, PostgreSQL, and many others). We test against Actual Technologies ODBC drivers for macOS, as they are the strongest player in the market.
As with importing tables, Cartographica uses the Import Map (Section 3.4.1, “The Import Map”) in order to map incoming data to coordinates or addresses.
![[Note]](Graphics/note.svg) | |
Due to the nature of the ODBC drivers on the Macintosh, there are some compatibility issues with older drivers under 10.6 and certain combinations of data and drivers. If you plan to import data with ODBC, please visit the ClueTrust Help Center and read the article on ODBC. |
![[Warning]](Graphics/warning.svg) | |
Cartographica currently does not support using external database as active storage for geospatial data. As such, we support database imports for address, coordinate, and grid data, and can Join geospatial and non-geospatial data, however we do not support the varied methods for storing geospatial data directly in databases. |
The trickiest part about reading data from a database using ODBC is setting up the ODBC connection on the system. Although that task is beyond the scope of this manual, there are good documents available for doing this from the vendors of the connection software. In particular, if you are using FileMake Pro, they have a good site, and Actual Technologies provides excellent support for their crop of 64-bit drivers.
As with tables, database data can be interpreted in a variety of ways when it is imported to the system. Coordinate imports, geocoding, and joins are all available for data from databases.
Acquiring coordinate data from a database
Choose >
The Data Source window appears.
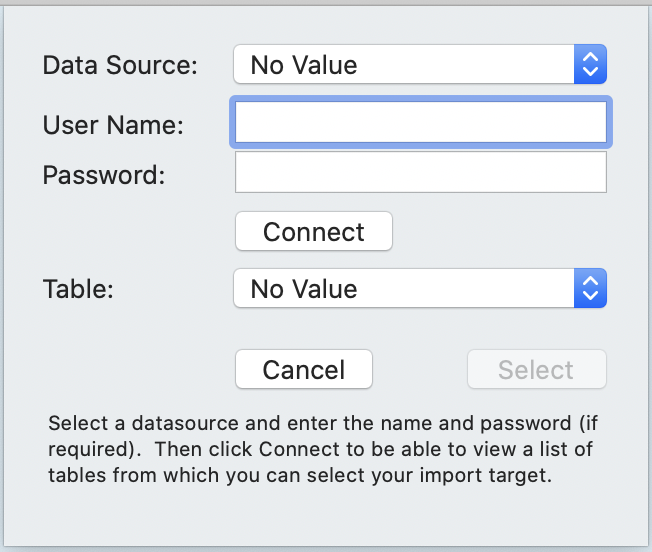
Select a Data Source and enter a User Name and Password if required.
Click and Cartographica will retrieve and present a list of tables.
Choose a table from the menu to import and click .
Using select an existing layer to append the data to, or choose .
Choose Coordinates from the right hand set of tabs in the window. This will enable coordinate import mode.
Because you are in coordinate import mode, the choices in your Map To column include , and along with the standard options of , , and any columns that exist in your selected target layer.
Refer to Section 3.4.1, “The Import Map” for details on how to map fields with the Import Map window.
Once you have imported the data, choose > to confirm that the coordinate system of the data is accurately represented.
Acquiring data from a database
Choose >
The Data Source window appears.
Select a Data Source and enter a User Name and Password if required.
Click and Cartographica will retrieve and present a list of tables.
Choose a table from the menu to import and click .
Using select an existing layer to append the data to, or choose .
Choose Geocode from the right hand set of tabs in the window. This will enable address geocoding mode.
Because you are in address geocoding mode, the choices in your Map To column include through , , , , and along with the standard options of , , and any columns that exist in your selected target layer.
At this point, you will be presented with an Import Map window. Please refer to Section 3.4.1, “The Import Map” for details on how to use the Import Map window.
Refer to Section 3.4.1, “The Import Map” for details on how to map fields with the Import Map window.
Once you have imported the data, choose > to confirm that the coordinate system of the data is accurately represented.